Welcome to my brand new Gallery section, added to bring this blog up to date. So far there are two galleries – one containing images of my jewellery collections, the other to showcase my photography projects. Right now it is still under development, so watch this space as I add more content. Enjoy!
The Arts Foundation Jewellery Awards 2016
Happy New Year to all of you Smart Jewellers out there! With 2016 only a few days old, I suddenly realised how terribly I am lagging behind with my blogging and there are a few long posts about my research activities still in the works – hopefully to be found on here soon!
But first I wanted to share some excellent news I received last November – I have been shortlisted for the prestigious Arts Foundation Jewellery Award 2016. With the awards ceremony at the end of the month fast approaching, I thought this was the perfect time to remind everyone to cross their fingers on my behalf on the 28th of January! You can read all about the awards and the other nominees in the Jewellery category in this recent Press Release or on the Arts Foundation website, where you can also find all the other categories and past award holders- for all you material enthusiasts out there the Material Innovation Category will be particularly exciting!
 I am absolutely delighted to be on the shortlist with so many talented and forward thinking practitioners and I am looking forward already to meet all of them in person on the 28th.
Tools, Tools, Tools… part 1
In my quest to make this site somewhat of a resource for budding digital jewellery designers, this post will be about one of my favourite topics: tools. As a jeweller, I am absolutely addicted to nice tools – give me a lovely vintage hammer, an unusually shaped pair of pliers or a set of precision Swiss needlefiles and any birthday/Christmas/anniversary is a great one. Of course, when I started working with electronics this meant that I immediately had an excuse to stock up on a brand new supply of great, sometimes weird looking tools. Here is some advice about what to get that I wish I’d had along the way…
1) Soldering Station – not the right place to save money!
It’s the most essential tool you’re going to get for your electronics work. Scrimping on your soldering iron is just not a good idea – you’re going to do countless joints and maybe even attempt a spot of SMD. You might initially get away with using a cheap, single temperature soldering iron, but as your skills grow so will your expectations of what you might want to be able to adjust on your iron. There are many different models out there and I don’t think I have found my perfect one just yet – but after owning a simple non-adjustable plug-in one (Conrad), a cheapish analogue temperature-adjustable one (Maplin – no numbers were given on the temperature dial, just the categories of low/medium/hot) and a digitally temperature controlled one (Maplin again) I have only started to achieve satisfactory results with the latter. It’s great to be able to adjust the temperature down to within a degree, and it heats up super quickly. It did not break the bank either – it will be a while before I outgrow this one. In electronics, Japanese tools are very highly regarded (in jewellery making too, by the way), and I have recently read somewhere that the Hakko brand is the one to look for if you want to go deluxe, but you’ll have to pay for it (or take a chance on an ebay listing, usually sent from China). On my next trip to Japan (if it ever happens…) I will be flying out light and returning with a suitcase full of lovely components and tools by Hakko. Until then I just discovered that my soldering iron can take the very reasonably priced Hakko tips, and that will have to do. The only other thing I might invest in is a battery powered ultra portable soldering iron, to take to workshops and teaching sessions. Oh, and don’t forget to get one of these brass wire sponge soldering tip cleaners to go with your new iron – the little wet sponge you get included for this purpose is a nightmare and cools your iron down every time you wipe it.
2) Wire Stripper/Crimping Tool
Stripping the plastic casing off a piece wire can be a pain…until you discover this little gadget. Again, some really nifty Japanese ones (the Engineer brand is great) are available on the web and they can be very handy as you can crimp terminals, strip wire and cut screws to length all using a single tool. If you’re going to do a lot of crimping I would recommend getting this tool instead/as well, as the handy ratcheting mechanism will save you from developing repetitive strain injury in the long term and deliver just the right amount of pressure, although it does take some practice to get the hang of it. Working on a small scale means trying to get as little wire mess as possible, and crimping your own terminals is the best way to achieve this.There is an excellent and very detailed tutorial on YouTube explaining some of the different tools and crimping techniques – practice makes perfect! The hardest part must be figuring out and getting all the crimps and terminals you need to do the job at hand…
3) A Breadboard…or three
You want to start prototyping and you want to start now! Well, a breadboard is just what you’ll need. Designed to enable you to fit your components together in test circuits, the choice of breadboards is dazzling. You can get tiny ones for on-the-go projects in all colours of the rainbow, small ones in a fancy tin, giant ones that hook together to make a mega-breadboard and the standard half-size version you see in all the electronics tutorials. I have been very happy with my breadboard for three years now – it even has some terminals to hook up a bench top power supply, which I initially thought would be mega useful, but have yet to try out! I would definitely recommend getting more than one, as otherwise you’ll be constantly dismantling ‘in-progress’ projects to make room for a new idea. Using a few tiny ones in clusters can also be very useful to keep component groups separated. To start with, one that has labelled rows could be a boon, as it is very easy to get confused what row you’re working in at any one time.
I have put together a suppliers list in the Vault section that I will keep adding to as I find more interesting sources for stuff!
Body Embellishment Exhibition
I am already getting very excited about the Body Embellishment Exhibition opening next month at the Mint Museum in Charlotte, North Carolina, where my Earconch will be on public display for the first time since my degree show at the Edinburgh College of Art in 2006. It will run from the 11th of April to the 6th of September – so plenty of time to marvel at the wonderful work on display. Fellow jewellers on display include greats such as Nora Fok, whose wonderful structural wefts with Nylon I have always adored. There is also a series of talks and events throughout the duration of the show.
I am so honoured to be a part of this exciting exhibition – here is a little feature in the style section of the Charlotte Observer which includes an image of my Earconch. If only I could afford to jet to the opening next month!

Make: Shift: Do!
As some of you might have noticed, I am not the greatest at getting posts out quickly. I like the pressure of a looming deadline, hence always plan my projects so that I work right up to the wire. This blog is more about reflecting on past events rather than acting as a news bulletin of my practice.
So, this very exciting event I was asked to be part of happened almost four months ago – on the 21st and 22nd of November 2014. DJCAD in Dundee was hosting a satellite event as part of the Crafts Council’s “Make: Shift: Do” programme, aiming to introduce the general public to new forms of innovation in craft with a series of exciting talks by digital makers and trying to get everybody involved by offering hands-on workshops. In Dundee, my lovely colleague and fellow ESRC PhD scholar Joanne Bletcher curated part of the event and managed to put together an absolutely inspiring exhibition of digital craft in the foyer of the newly refurbished DJCAD Matthew building. The morning session of talks by fellow digital makers included highlights such as a demonstration of Lynsey Calder’s thermochromic tutu, and textile artist Collette Paterson’s amazingly tactile latex and felt creations. Read all about it and more on the Facebook page dedicated to the event!
I was very honored to be asked to lead a workshop on working with thermochromic silicone in the afternoon, as well as take part in the exhibition. Here are some impressions of the opening of the exhibition. Enjoy!


The Digital Soane
I recently took part in a really exciting collaborative project between the Sir John Soane’s Museum in London and the Royal College of Art alumni initiative In Tandem, supported by the Jerwood Foundation. For the project, the bust of Sir John Soane was digitally scanned to create a 3D model which was in turn divided into a number of fragments. Each participating designer was then given a digital printout of a randomly selected fragment to work with and design their own object in response. I was fortunate to receive an ear, which I turned into a temperature responsive wall sculpture with detachable necklace, based on architectural elements found within the Soane Museum.


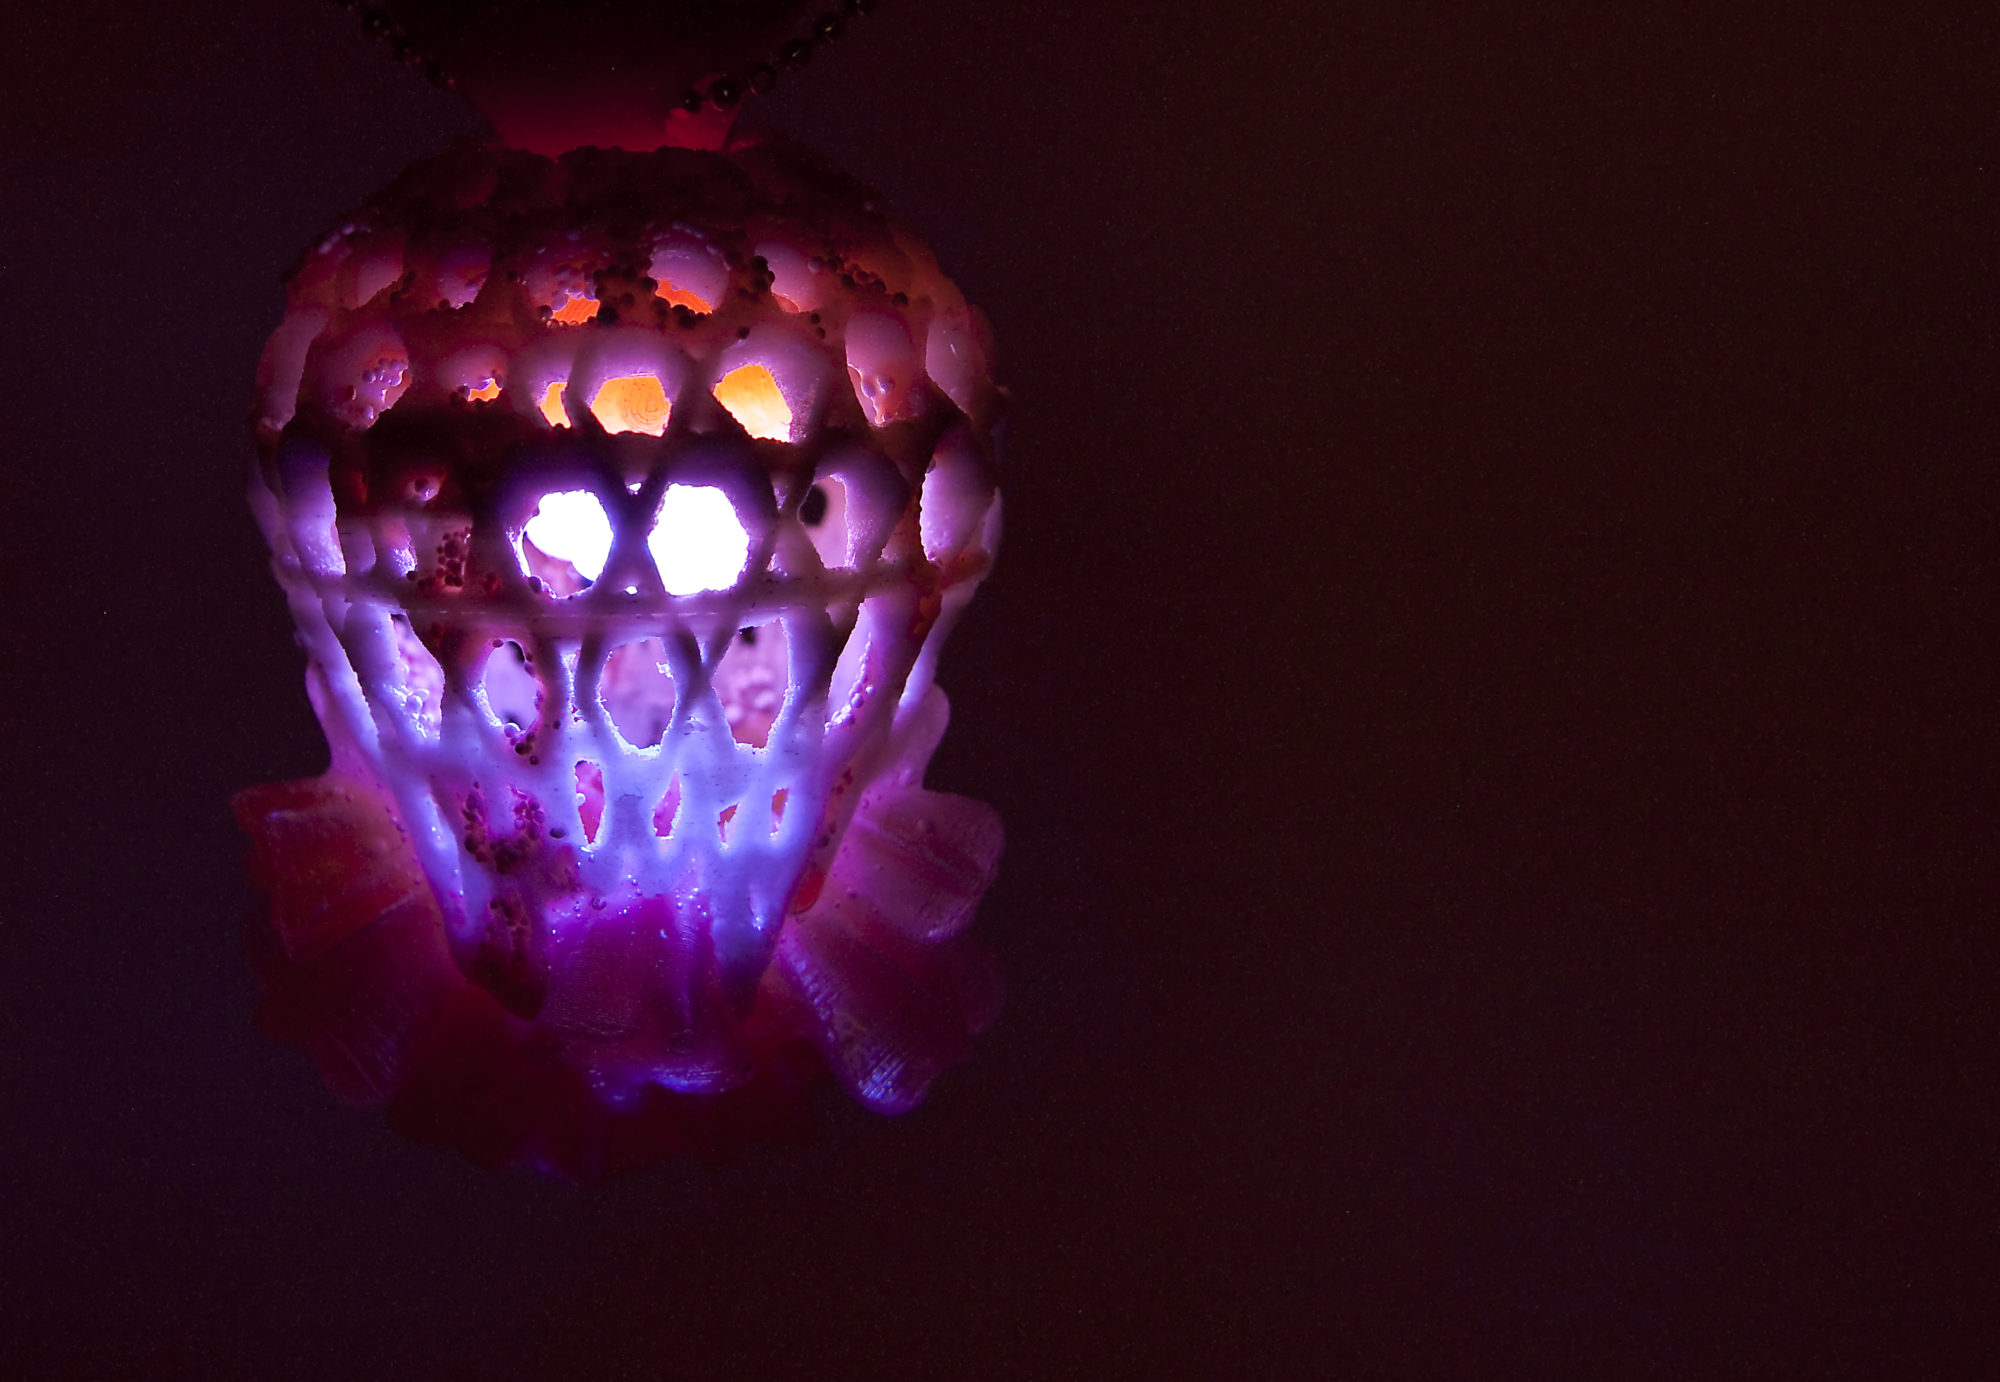
I wanted to create something that looked and felt almost organic while being connected intimately to Sir Soane, his collections and his house. The colour was inspired by the eponymous yellow south drawing room with its black architectural mouldings, while the shapes of the necklace were abstractions of the famous domed ceiling of the breakfast room and Sir John’s urn collection. The title “Soane’s Burning Ear” refers to a story about the betrayal of Sir John’s son George, who published an article in a prominent architectural journal deriding the architectural practice of his father. This has come to be seen as a turning point in Soane’s life as the shock was allegedly responsible for the death of his beloved wife Elizabeth. The title “Soane’s Burning Ear” plays on the expression “My ears are burning”, and reflects Soane’s anger and disappointment with his son after this episode, expressed through the red colour of the silicone.
The object itself consists of two parts – the fragment of Sir John’s ear, taken from the bust and coated in a temperature reactive silicone and a 3D-printed pendant made from SLA plastic with a black, facetted sterling silver chain. The ear fragment acts as a holder for the pendant, and can either be displayed as an object or hung on the wall via the small hook on the back. When the pendant is detached, the ear becomes clearly visible, and a piece of the pendant seems to stay behind, giving the impression of Sir John wearing an earring. When the temperature of the fragment changes, for example through prolonged touch, direct sunlight or a rise in environmental temperature, the silicone changes colour and slowly transitions from dark red to bright yellow, blending in with the pendant and thus unifying the piece. This change is symbolic of time passing and obscuring the emotional turmoil of the past, shifting the focus onto the fragments of Sir John’s legacy as an architect and collector.
An exhibition of all pieces from this project at the Sir John Soane’s Museum will be open to the public from the 4th – 22nd of November 2014.
Back to School…
After a prolonged break from my Arduino experimentations I have finally made the time and, more crucially, room in my studio to return to the breadboard. It has not been a triumphant return. I could only remember the most basic facts about breadboarding, using electronic components and calculating resistance. Thankfully, I also had a whole new bag of funky components to break open, and after a little bit of online research, knowledge I had painstakingly acquired over the summer came flooding back to me in bits and pieces. I even vaguely remembered my plan (for which I had ordered said components) and how to go about executing it. However, of course my plan has changed since then and now I am unsure of how to combine the infinite variations of LEDs I have ordered in a meaningful way.
When looking over my components, the first surprise came when I inspected the Avago colour light sensor I had been so excited about in the summer. They say a picture is worth 1000 words, but to be honest I was still completely taken aback by the tiny size of this part, despite the useful size comparison picture next to it. How am I meant to solder that onto anything??? Briefly regretting not getting the fully assembled evaluation board instead (mainly because parts for wearable jewellery need to be tiny) I am now having to reconsider its immediate use in this project as I doubt my skills will advance quickly enough to make this part work (including all the programming). I had the foresight to order a simple optical sensor at the same time, and might use this instead in a more crude light/dark variation, which I might actually get to finish in time (the piece will be exhibited in March and needs to be delivered by February). As things stand right now, I will be over the moon if I even get the LEDs to work as I want them to and get all the soldering done on the components to fit them into the ‘chassis’, let alone complex colour sensing programming.
A significantly useful idea I have come across in my research is to add a ‘sleep’ function to an Arduino programme in order to prolong battery life by turning off any funtionality not needed when the board is in sleep mode. As anyone working with wearables is aware of, battery life is one of the major problems, and so finding a way to make a single charge last longer is a great step in the right direction. I found a brilliant tutorial at Sparkfun on the subject, but unfortunately it exceeds my budding Arduino skills as of yet. However, I am sure I will return to it in the not so distant future – food for thought!
BlinkM Smart LEDs
 In my search for the right LED to use in my most recent project, I came across the fully programmable and sequenceable BlinkM LEDs. These are very useful to those who want to create stunning light effects without going into the vagaries of Arduino programming. Simply use the colour sequencing tool, select your colour choices and let the colourful fun begin!