xCoAx 2015 Glasgow

A few weeks ago I gave a paper at the XcoaX 2015 conference held at the Centre for Contemporary Arts in Glasgow and this year organised and hosted by the University of the West of Scotland. When I initially saw the call for papers in January, I was intrigued by the eclectic mix of themes, encompassing computation, communication, aesthetics, human computer interaction, coding, digital installation art and the ominous ‘X’. When my paper on the aesthetics of creating stimulus-responsive jewellery was accepted, I was really excited to be a part of this diverse conference and could barely wait for the end of June to roll around.

This year the conference consisted of four different events, including an evening of digital performances and the eponymous ‘Algorave’ held at the GSA, in addition to the more traditional paper presentations and an exhibition of works. After a delightful evening reception on the Wednesday, the paper presentations were held over two consecutive days and consisted of five sessions, loosely linked by themes and content. I thoroughly enjoyed all the presentations, and was particularly intrigued by the amount of research focusing on sound related installations. This was a field I had been unaware of before XcoaX, and the idea of ‘live coding’ performances, where programmers write freestyle lines of code to create sound building blocks which in turn are assembled as electronic music is absolutely fascinating. Other highlights included Hanna Schraffenberger and Edwin van der Heide’s Sonically Tangible Objects which provided the audience with a brief glimpse into a future augmented reality, whereas Nicole Koltik’s short paper on philosophies of the artificial and Sofia Romulado’s analysis of videogames as an artform struck a particular chord with me.

On Friday evening we were treated to a string of performances, and Thor Magnusson and Pete Furniss gave a wonderful demonstration of how live coding and traditional instruments can be used to create a completely immersive ‘wall of sound’ experience in their piece Fermata. Another highlight was provided by digital artist Jung In Jung, who had brought dancers Dane Lukic and Stefanos Dimoulas to perform in their interactive sound and dance collaboration Thermospheric Station.

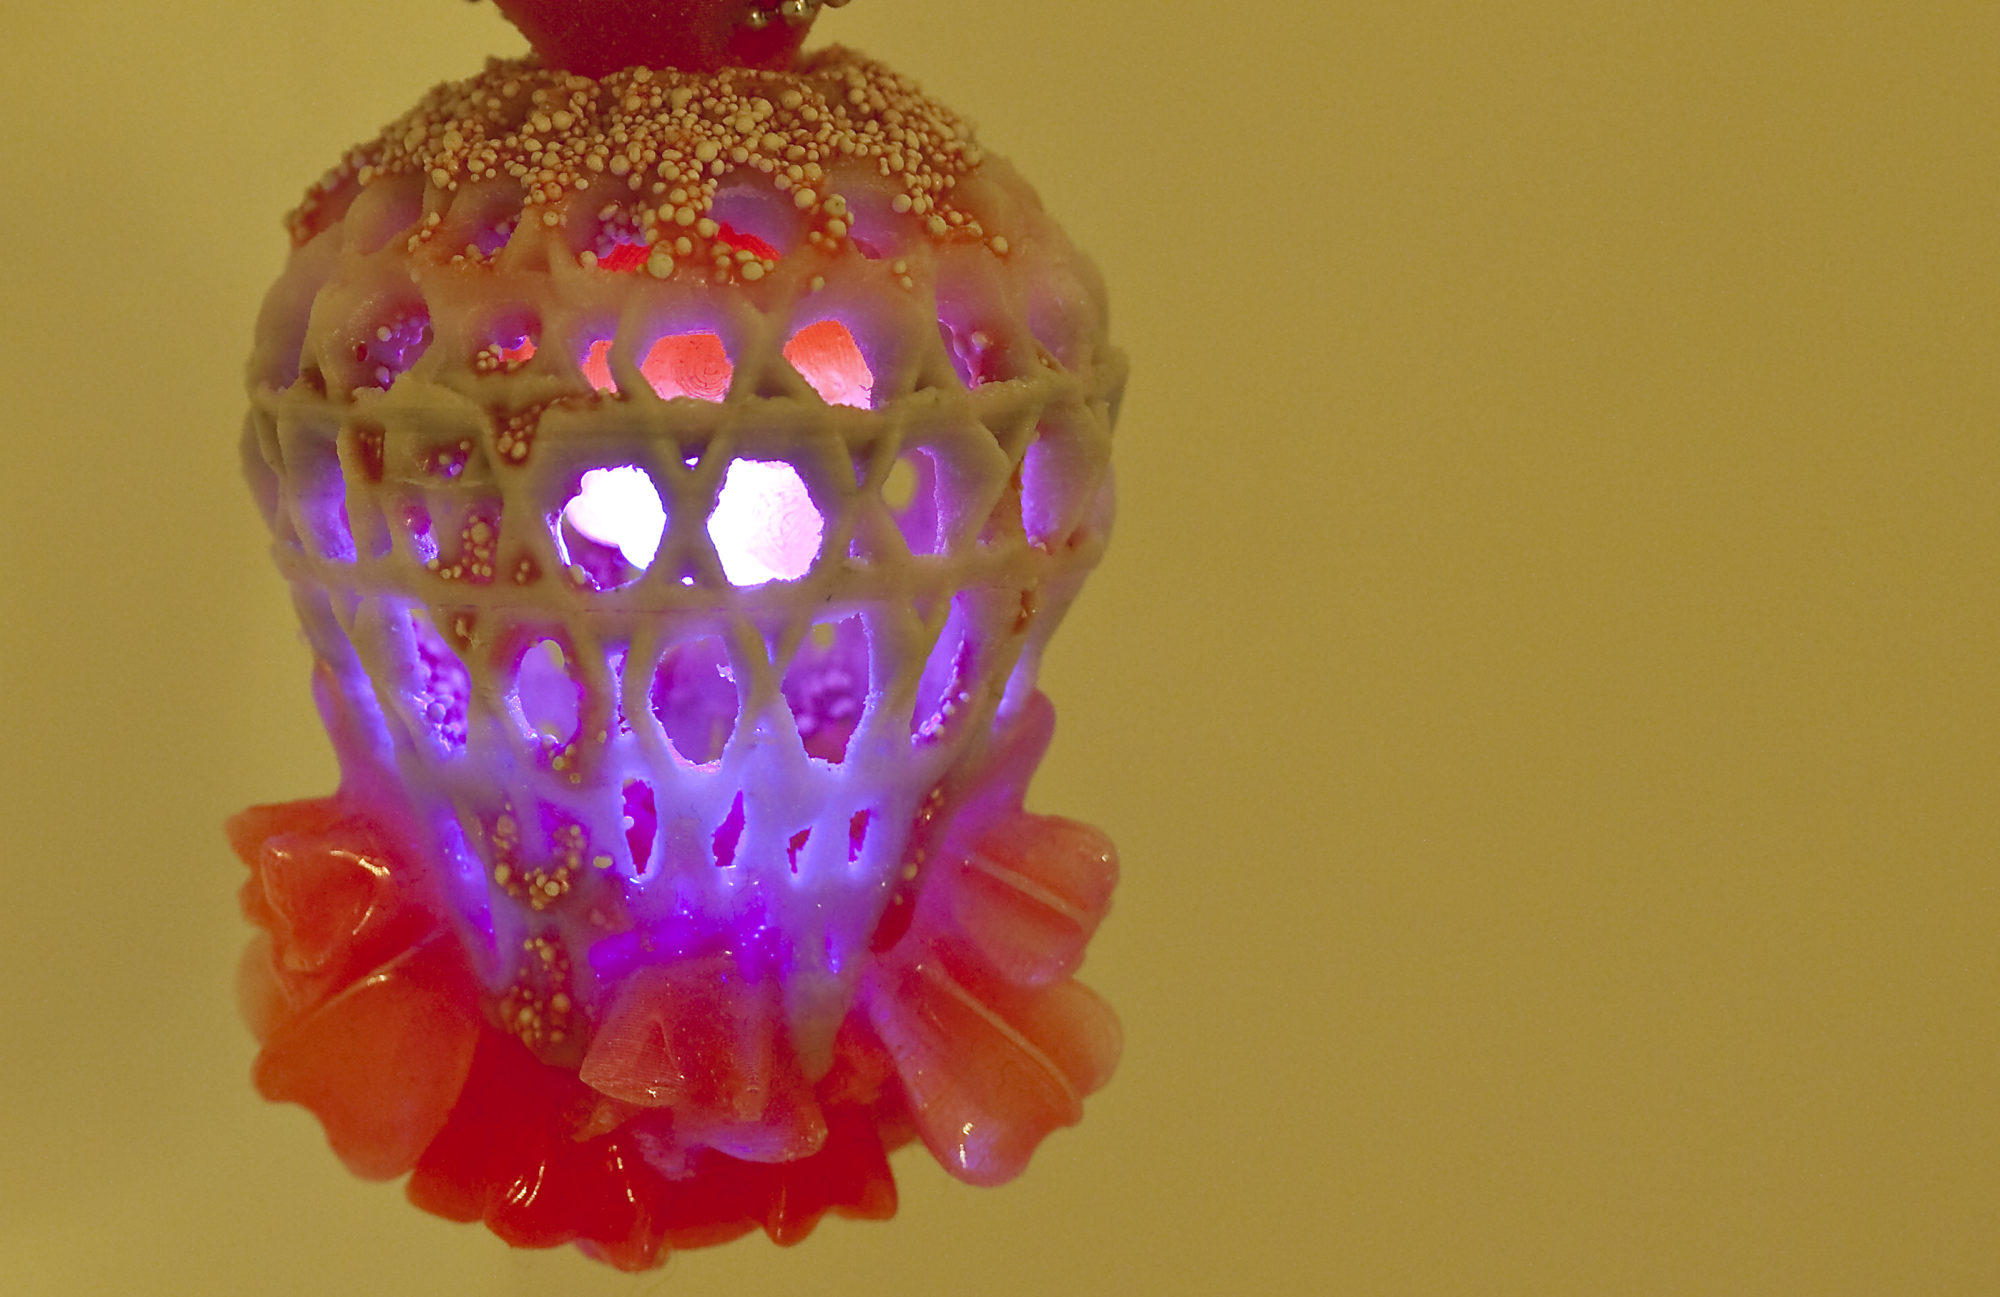
Altogether it was an amazing experience, and one I am hoping to repeat next year when the conference will be held in Bergamot. Better come up with some fresh material by then! I will finish this brief report with images from the exhibition. While all of the works on show were absolutely fascinating (and I finally got to try some real VR goggles!), two in particular struck a chord – Andreas Zingerle and Linda Kronman’s 5-channel interactive audio installation called ‘Let’s talk business’, a humorous installation exploring online scam narratives and Raul Pinto, Paul Atkinson, Joaquim Vieira and Miguel Carvalhais’ growth objects, which use mushroom spawn to create objects based on biological generative systems. See you next year in Bergamot!

Spam 1
Andreas Zingerle and Linda Kronman: ‘Let’s Talk Business’ Installation with Spam can telephones
Mushrooms 1
Pinto, Atkinson, Vieira and Calvahais: ‘Growth Objects – Biological Generative Systems’
Mushroom 2
Detail of a ‘Growth Object’


The Wilderness of Micro Jargon or how I deciphered prototyping langugage

It has been an interesting week here at Smart Central, most of which I spent wrestling with the helpful language used on websites selling components and in their respective datasheets. Even though I have now been trying to get serious about prototyping for more than three years, some instructions given with regards to how to activate certain functions offered by components still baffle and confuse me deeply. So much prior knowledge is just assumed to exist on the part of the creative technologist by the authors of these sites and datasheets, and unless you happen to know someone you can ask what something means exactly, and more importantly how to execute a certain instruction, you run the risk of ruining your components. So I thought I’d write this post about my recent experience with the Adafruit Standalone Toggle Capacitive Touch Sensor breakout.

In theory, this is a beautiful component to use to Toggle Capacitive_1375incorporate a touch sensitive switch into your project – you can even replace the integrated touch pad with a conductive surface to make touch sensitive keys that blend in more discreetly with your project by soldering a connector into the pin below the touch pad. There is a momentary version of this sensor available, which is only active when contact is made, but for my current purpose the on/off toggle function works nicely. Now, because space is at a premium when working on a jewellery scale, even the tiny dimensions of this sensor (about 1.5cm x 2.5cm) were too big for my project and I decided to be daring and simply lop off the redundant integrated touch pad and status indicator LED with a jeweller’s saw. I don’t advocate this as the best way of quite literally ‘hacking’ a component, but in this case I felt the value of the learning experience outweighed the risk of ruining the sensor (I bought a spare just in case). However, much to my surprise the maimed component still worked perfectly afterwards – I made an educated guess about the connections I was savaging, and it seems to have paid off. Great – so far so good!

The next step is where things really started to unravel for me – I wanted to make use of the automatic timer function the sensor had to offer. I had read the following instructions in the Adafruit guide for this part (which covers all their touch sensors but none in greater depth):

It also supports a configurable time-out to turn off the output automatically after a delay. To select this mode, cut the ‘TIMER’ jumper and connect a resistor & capacitor to the TIME pin. For a circuit diagram and resistor/capacitor calculations, see page 13 of the datasheet.

You can also just connect TIME to Vdd and the chip will turn off approx 15 minutes after being turned on. Connect TIME to OUT and the chip will time-out approx one hour after being turned on.

Wow. There are a lot of assumptions of prior knowledge in that paragraph. What is the ‘Timer’ jumper (or indeed a jumper)? How do you cut it? Does the second part of the paragraph about the pre-programmed time-out function also require the jumper to be cut? Do you have to add a resistor/capacitor in that case? I decided to look at the datasheet to gain clarity. Unfortunately, the datasheet is not for the actual breakout board, but for the processor used on the breakout. It is highly technical. It did not address any of my questions, as it is clearly written for a highly specialised audience of electromechanical engineers, who know exactly what they’re doing. I was just about able to decipher some of the instructions relating to the timer function, but what I really needed was the map of the different connections and resistors used on the breakout board, also known as an eagle schematic. These I found tacked on at the very end of the guide thankfully, and soon things started to become clearer. Let’s take a look at the back of the board to start with.

A ‘jumper’ I found out after much googling, is a short length of conductor used to close a break in or open, or bypass part of, an electrical circuit. This can be either a separate component, a simple wire or a printed trace on a PCB. In this case it turned out to be the latter – the toggle breakout indeed has two jumpers, one for the timer function and another for the LED indicator of the integrated touch pad (hacked off in my case):Adafruit Toggle 1375 Back modifiedTo ‘cut’ the timer jumper, I discovered, means simply to use a sharp scalpel and scrape away the small bridge between the two larger pads:Timer CutThis, according to the eagle schematic, changes the state of the timer pinout to ‘high’ (or active) by removing its connection to ground (which rendered it ‘low’ or inactive). It is apparently possible to undo this change by connecting the two pads with a blob of solder, but I haven’t tried this as of yet. It is then merely a matter of soldering a wire between the TIME pin and either the VDD pin (15 min auto turn-off) or GND pin (60 min auto turn-off). You can also set the auto turn-off to any interval you like, by adding resistors and capacitors of the appropriate value as specified on the datasheet, but for me 60 minutes will be just fine.

This may seem like a lot of work merely to figure out a single component, but in the process I have also demystified the language used in PCB instructions and gained more knowledge, which is always a good thing…until the next time!

Tools, Tools, Tools… part 1

In my quest to make this site somewhat of a resource for budding digital jewellery designers, this post will be about one of my favourite topics: tools. As a jeweller, I am absolutely addicted to nice tools – give me a lovely vintage hammer, an unusually shaped pair of pliers or a set of precision Swiss needlefiles and any birthday/Christmas/anniversary is a great one. Of course, when I started working with electronics this meant that I immediately had an excuse to stock up on a brand new supply of great, sometimes weird looking tools. Here is some advice about what to get that I wish I’d had along the way…

1) Soldering Station – not the right place to save money!

It’s the most essential tool you’re going to get for your electronics work. Scrimping on your soldering iron is just not a good idea – you’re going to do countless joints and maybe even attempt a spot of SMD. You might initially get away with using a cheap, single temperature soldering iron, but as your skills grow so will your expectations of what you might want to be able to adjust on your iron. There are many different models out there and I don’t think I have found my perfect one just yet – but after owning a simple non-adjustable plug-in one (Conrad), a cheapish analogue temperature-adjustable one (Maplin – no numbers were given on the temperature dial, just the categories of low/medium/hot) and a digitally temperature controlled one (Maplin again) I have only started to achieve satisfactory results with the latter. It’s great to be able to adjust the temperature down to within a degree, and it heats up super quickly. It did not break the bank either – it will be a while before I outgrow this one. In electronics, Japanese tools are very highly regarded (in jewellery making too, by the way), and I have recently read somewhere that the Hakko brand is the one to look for if you want to go deluxe, but you’ll have to pay for it (or take a chance on an ebay listing, usually sent from China). On my next trip to Japan (if it ever happens…) I will be flying out light and returning with a suitcase full of lovely components and tools by Hakko. Until then I just discovered that my soldering iron can take the very reasonably priced Hakko tips, and that will have to do. The only other thing I might invest in is a battery powered ultra portable soldering iron, to take to workshops and teaching sessions. Oh, and don’t forget to get one of these brass wire sponge soldering tip cleaners to go with your new iron – the little wet sponge you get included for this purpose is a nightmare and cools your iron down every time you wipe it.

2) Wire Stripper/Crimping Tool

Stripping the plastic casing off a piece wire can be a pain…until you discover this little gadget. Again, some really nifty Japanese ones (the Engineer brand is great) are available on the web and they can be very handy as you can crimp terminals, strip wire and cut screws to length all using a single tool. If you’re going to do a lot of crimping I would recommend getting this tool instead/as well, as the handy ratcheting mechanism will save you from developing repetitive strain injury in the long term and deliver just the right amount of pressure, although it does take some practice to get the hang of it. Working on a small scale means trying to get as little wire mess as possible, and crimping your own terminals is the best way to achieve this.There is an excellent and very detailed tutorial on YouTube explaining some of the different tools and crimping techniques – practice makes perfect! The hardest part must be figuring out and getting all the crimps and terminals you need to do the job at hand…

3) A Breadboard…or three

You want to start prototyping and you want to start now! Well, a breadboard is just what you’ll need. Designed to enable you to fit your components together in test circuits, the choice of breadboards is dazzling.  You can get tiny ones for on-the-go projects in all colours of the rainbow, small ones in a fancy tin, giant ones that hook together to make a mega-breadboard and the standard half-size version you see in all the electronics tutorials. I have been very happy with my breadboard for three years now – it even has some terminals to hook up a bench top power supply, which I initially thought would be mega useful, but have yet to try out! I would definitely recommend getting more than one, as otherwise you’ll be constantly dismantling ‘in-progress’ projects to make room for a new idea. Using a few tiny ones in clusters can also be very useful to keep component groups separated. To start with, one that has labelled rows could be a boon, as it is very easy to get confused what row you’re working in at any one time.

I have put together a suppliers list in the Vault section that I will keep adding to as I find more interesting sources for stuff!

Tiny little Arduinos…

So, in my quest to create fabulous wearable futures for jewellery lovers, I have come to a point where I have to bite the bullet and get deeply involved in the microelectronics side of my research. The arrival of the Ultimaker has pushed my material experimentation to a whole new level, and the moment has finally come to start creating first assemblies of both materials and electronic components for my symbiotic jewellery objects.

Since I started my research, a lot has happened in the world of wearable computing – particularly in terms of miniaturisation, but also to some extent functionality. There seems to be more of an appetite now for developers to release ever-smaller processors and exciting sensors to the hacker community, and more and more people are starting to use them. For someone like me who is just starting out with electronics (and even after extensive reading and research around the subject for the last three years I would still consider myself a beginner) this is a blessing, as a larger user base means more community support in the shape of blogs, forums and user guides. The Adafruit website has a humungous database of learning projects, starting from scratch with the very basics and ranging all the way to the sublime. Another great resource for getting started is the Sparkfun website, which has a great learning section as well as a user forum. If you live in the States either one of these are very handy for you – just choose a project and order the components to go with it directly from the supplier. In the UK, you have to go through third party retailers, but between them they usually have the full range of components available (including some more from other brands).

In my latest efforts to intergrate electronics into jewellery, I was delighted to find that since I last looked in 2013, not one but five new Arduino-based microcontroller boards had been developed in an appropriate size range for wearables. Brilliant News!…Now which one to choose??? For a previous project, I had dipped my toes into using the Arduino Pro Mini 328 5V and 3.3V boards, which are a great little option if you need a lot of output pins and a reset button. I still have two of those in the workshop, and I am sure they will come to be used in the near future for one of my larger, more elaborate pieces. But they are rectangular in shape, and a bit awkward to use within the more rounded, organic shapes I have been making of late. Also they are quite possibly processing overkill for what I am trying to (and capable of) do in terms of programming. They have a similar functionality to the much larger Arduino Uno, which is definitely a lot more than I need at this point, although I like using one for running prototype programs and test the wired connections.

An immediately appealing option for using in my projects were the Adafruit Flora and Gemma, with the latter being smaller, with fewer pins and no serial monitor capability. They are both circular, which is a much easier shape for me to incorporate than the usual rectangular geometries of PCBs. I ordered the Gemma (the Flora is probably a little bigger than I would like for my use), and it is a nearly perfect size for most of my jewellery projects, with the handy JST and USB mini jacks meaning programming and powering the controller is a doddle. However, I am as of yet struggling with the programming – the first example sketch  I tried to load onto it would not work (and we’re not talking Blink here btw), because of the lack of a serial monitor. I have not given up on Gemma, but I might have to postpone until my programming knowledge catches up. Another small controller recently introduced by Adafruit is the Trinket, which I have not yet had a chance to consider, but which is supposed to have the processing power of an Arduino Uno and looks really really neat and tiny…

…Which brings us to the last two new arrivals to the wearable controller market of late, the TinyDuino and TinyLily. Born out of a Kickstarter campaign by developers TinyCircuits,  these are whole systems of tiny microcontrollers and accessories. Essentially built around the hardware of the Arduino Pro Mini and LilyPad series, the TinyDuino is square in shape and comes with an array of development boards and accessories, while the TinyLily is round and merely the size of my thumbnail but still has 8 sewable ports (4 analogue/4 digital) and two power outlets to play with – plenty for my requirements. The input voltage on these two controllers is variable between 2.7V and 5.5V, so allows for use with a large range of sensors and devices. Here is a size comparison of the Flora, Gemma and TinyLily for reference:

Size Comparison TinyLilyWhile the TinyLily is slightly more awkward to program and connect, it has a definite size advantage over the other two that for making digital jewellery could make all the difference. It is slightly more expensive than the Gemma and about half the price of the Flora, but that seems about right in terms of functionality and processing power. Just for comparison, here are the Trinket, Trinket Pro and Arduino Pro Mini Boards:

Size Comparison Trinket

Sizewise they are perfectly suitable for wearables, especially if you need the advanced functionality and processing power – with Adafruit Neopixels for instance. Their rectangular shape makes them a bit awkward for me, but I could see how they would work in the right situation. Now, on to tackling the programming…

Back to School…

After a prolonged break from my Arduino experimentations I have finally made the time and, more crucially, room in my studio to return to the breadboard. It has not been a triumphant return. I could only remember the most basic facts about breadboarding, using electronic components and calculating resistance. Thankfully, I also had a whole new bag of funky components to break open, and after a little bit of online research, knowledge I had painstakingly acquired over the summer came flooding back to me in bits and pieces. I even vaguely remembered my plan (for which I had ordered said components) and how to go about executing it. However, of course my plan has changed since then and now I am unsure of how to combine the infinite variations of LEDs I have ordered in a meaningful way.

When looking over my components, the first surprise came when I inspected the Avago colour light sensor I had been so excited about in the summer. They say a picture is worth 1000 words, but to be honest I was still completely taken aback by the tiny size of this part, despite the useful size comparison picture next to it. How am I meant to solder that onto anything??? Briefly regretting not getting the fully assembled evaluation board instead (mainly because parts for wearable jewellery need to be tiny) I am now having to reconsider its immediate use in this project as I doubt my skills will advance quickly enough to make this part work (including all the programming). I had the foresight to order a simple optical sensor at the same time, and might use this instead in a more crude light/dark variation, which I might actually get to finish in time (the piece will be exhibited in March and needs to be delivered by February). As things stand right now, I will be over the moon if I even get the LEDs to work as I want them to and get all the soldering done on the components to fit them into the ‘chassis’, let alone complex colour sensing programming.

A significantly useful  idea I have come across in my research is to add a ‘sleep’ function to an Arduino programme in order to prolong battery life by turning off any funtionality not needed when the board is in sleep mode. As anyone working with wearables is aware of, battery life is one of the major problems, and so finding a way to make a single charge last longer is a great step in the right direction. I found a brilliant tutorial at Sparkfun on the subject, but unfortunately it exceeds my budding Arduino skills as of yet. However, I am sure I will return to it in the not so distant future – food for thought!

BlinkM Smart LEDs

blinkm-lrgIn my search for the right LED to use in my most recent project, I came across the fully programmable and sequenceable BlinkM LEDs. These are very useful to those who want to create stunning light effects without going into the vagaries of Arduino programming. Simply use the colour sequencing tool, select your colour choices and let the colourful fun begin!

Learning Arduino…the long journey

Since starting my research at Dundee I have become more and more aware of the wonder that constitues the world of Arduino, also known as ‘Microcontroller Programming that Artists can understand”.

After an introductory lesson on the very basics of connecting and programming by our resident tech-whizz Ally in March (breadboard anyone?), my first self-devised project was to wow fellow materials researchers at the CIMTEC Conference with a fully interactive Poster that lights up on touch. Armed with this essential starter guide and a box full of semi-familiar components I set to work to teach myself Arduino. My initial plan – to fashion a switch out of conductive ink – failed due to the intricacies of the Royal Mail Postal Service, but after using a simple push switch and a sleepless night I got the poster to light up on demand as planned…

…for about 2 hours after which the battery (LiPo 110ma) was flat. As the conference organisers were opposed to me taking the poster down every two hours to re-charge the battery I finally had to admit defeat, but fortunately the poster with its silicone shapes and colourful visuals made enough of an impact as it was (and the non-functioning electronic components were well hidden, so no explanations were necessary). Power supply is a serious concern for the wearable electronics practitioner though, and unfortunately one for which there are currently no truly satisfactory answers. Not that that’s going to stop me from looking for them….

Anyway, on to my next Arduino venture. Heartened by the fact that I managed to set up and program a fully functional LED touch switch Arduino circuit (without blowing up the board – a Lilypad incidentally – or the LEDs) I have become more ambitious and want to greatly improve on my trial run. The opportunity presented itself in the shape of the Goldsmiths’ Fair 30 Year Anniversary exhibition, for which I am currently creating a piece that will respond to light changes by activating different groups of LEDs with differing levels of intensity according to ambient conditions. I am planning to use the Arduino Pro Mini 5V micro controller this time (for size reasons) to power about 10 LEDs, but only five at any one time. I am also thinking about using this color light sensor which can not only sense brightness levels but also the colour of light. There’s an extensive tutorial on how to program the device on this Blog, but to be fair I was already out of my depth after the first paragraph, so we’ll see how that goes, especially considering the deadline for handing the piece in. If all else fails, I will just use a bog-standard on/off light sensor and practice a bit more until deploying the other one in a different project.

Power supply is as per usual a great concern, and due to the nature of the exhibition I have decided that I will have to plump for the inelegant solution of a mains powered adaptor – there is no way I will be able to persuade anybody to change the battery once or twice a day and re-charge it when the piece is in situ at the exhibition.

So, that’s it on the Arduino front at the moment – I often think that the mountain I have to climb in terms of mastering microelectronics is still a large one, but at least I have started the ascent…