When I got my Ultimaker, a little card fell out of the package, advertising a website for 3D printing enthusiasts called 3D Hubs. Here, individuals can list their 3D printers and take orders to print out parts for others in their city. The customer uploads their model through the website, and the hub in return for a reasonable fee prints the model within a specified time frame. I think this is a brilliant idea, especially as it can often take weeks to get something printed from one of the main printing bureaus. As a student or hobbyist, sometimes all you want is a quick prototype for visualising what your model would look like in real life, working to impossible seeming deadlines.
So, I decided to set up my own Hub – Geotronic Collective – and I am pleased to say so far my experience has been very positive. I have just finished my first two orders, and hopefully made two customers very happy. It has been an interesting experience for me too, printing two things that are so very different from my own work, each pushing the limits of what the UMO+ can achieve in terms of print quality and especially fine detail. Here is a print of a Fantasy Creature I did for digital artist Agneta Miskiv:
Printed with 0.1mm layer height in Faberdashery Storm Grey PLA
Initially I was worried about the very fine detail features of this print snapping off, especially the fingers and spikes on the back of the head. Because of the complexity of the model, I decided against using Cura to generate the support structures, and instead used open-source software Meshmixer, which is particularly good at creating custom supports. This is one thing that has been bothering me about Cura – not being able to edit support structures at the slicing stage, and instead having to rely on the software to get it right. In Meshmixer, there are a lot of adjustable parameters as well as custom profiles, then the software suggests a network of supports that can also be amended by the user as they see fit. A perfect combination between automation and control. There is a great tutorial on how to use Meshmixer on blog Extrudable Me, as unfortunately the documentation it comes with is not particularly helpful. I have found that sometimes the support suggested by the program can be a bit overkill, but the structures snap off very easily, often in one piece, which is a big advantage for delicate prints in particular. Hopefully more orders will come my way soon so I can continue my adventures in 3D printerland!
PLA (or Polylactic Acid) is a great material to print with on the Ultimaker – in fact I would go as far as to say it is the recommended material to print with, especially if you’re just starting out. It has a lower melting point than ABS, and does in theory not need a heated bed to get good adhesion. It is ecologically sound and made from renewable resources such as corn starch or sugarcane. It comes in a rainbow of colours and some very cool speciality filaments (thermochromic, UV active, glow-in-the-dark and fluorescent to name but a few). It also does not smell as strongly as ABS when printing. You can even shred any failed prints and re-extrude them into beautiful fresh reels of filament if you happen to have a Filastruder.
As a downside, it is not as structurally strong as ABS or Nylon, so if you are making high impact engineering parts it might not be your best choice. Ditto any parts that need to withstand higher temperatures – the glass transition temperature (where it starts to go soft) for PLA is around the 70C mark, meaning if you were going to pour hot water into a receptacle made from PLA it would start to deform – not an ideal scenario. There is also the issue of long term material degradation – it has a limited shelf life, and in time parts printed with it will start to become brittle. I have not yet witnessed this effect personally, so it is not really a deterrent for me. PLA is also quite difficult, if not impossible, to print with an all-metal hotend, as clogs can form as a result of the higher operating temperature. The Ultimaker hotend is not all metal, so very well suited for PLA. Stringing and oozing are also more of an issue with PLA, due to its slightly ‘softer’ texture, but this can easily be countered by adjusting the retraction settings in your slicer software of choice, Cura in my case.
While my Ultimaker came with a reel of Ultimaker PLA, I had already ordered another brand of filament I had read a lot about on the forums. Faberdashery PLA filament is manufactured in the UK, so as green as it gets in terms of carbon footprint through long-distance shipping. It comes in an absolutely vast array of colours and finishes, and even better is sold by the meter with 5m being the minimum quantity you can order of any one colour. For someone like me, who makes very small shapes but wants to experiment with many different colours this is absolutely perfect. I initially ordered two of their sample packs, made up of 10m of 10 different colours, in both opaque and transparent. And what beautiful colours they contained! Here are just a few samples:
Faberdashery Filament in (from left to right): True Lagoon, Space Marine and Princely Purple.
My aim is to eventually print a Hyperhive Cocoon in each colour I have. Unfortunately, thoughts of such a scientific methodology are easily interrupted by artistic exuberance, and things got the better of me when I started playing with changing the filament colour mid-print:
Faberdashery filament in (left to right and bottom to top): Dark Sapphire, Aurora, Orange Fizz, Punk Star Pink, Orange Fizz, True Lagoon, Dark Sapphire, Orange Fizz and Lemon Drop.
Faberdashery also do some very appealing metallics:
Faberdashery filament in (left to right): Space Marine and Mercury Red
I can’t wait to try out all the other very appealing colours on their website!
Since getting my UMO+ up and running I have been building up to trying out flexible filaments. I was so excited about printing flexible structures for my research that even before getting the printer I had ordered several spools of filament from different sources – without really checking whether it would be compatible with the printer! I thought as long as it was the right diameter (between 2.85mm and 3mm) it would surely work.
WRONG!
I cannot emphasise enough that it is really important to understand the limitations of the different types of 3D printers out there. The Ultimaker is a Bowden-type printer – the filament is pushed into the hotend through a 70-80cm long plastic bowden tube by a material feeder mounted to the back of the printer. In other words, there is a distance of about 80cm between the hotend and the feeder. For printing materials such as PLA and ABS this method works well – the filament is stiff and the force of pushing it translates reasonably rapidly, although I have read somewhere that problems with stringing and oozing on more intricate structures are more likely to occur because of a slight delay with retraction. For flexible filament however, the Bowden-type is probably the least suitable type of printer. The filament itself is already quite flexible, and the feeder squishing it forward through the tube causes a slight delay, meaning a lot of people experience underextraction or – even worse – terrible jams. Oh, and forget about retraction on intricate structures! The way forward here is to adjust the flow rate and printing/travel speed – you want to keep the material coming out of the nozzle as a nice steady ooze and then prevent stringing as much as possible by making the nozzle whizz over the print. There is a great flexible filament comparison thread on the Ultimaker forum, which was my starting point before embarking on my first tests.
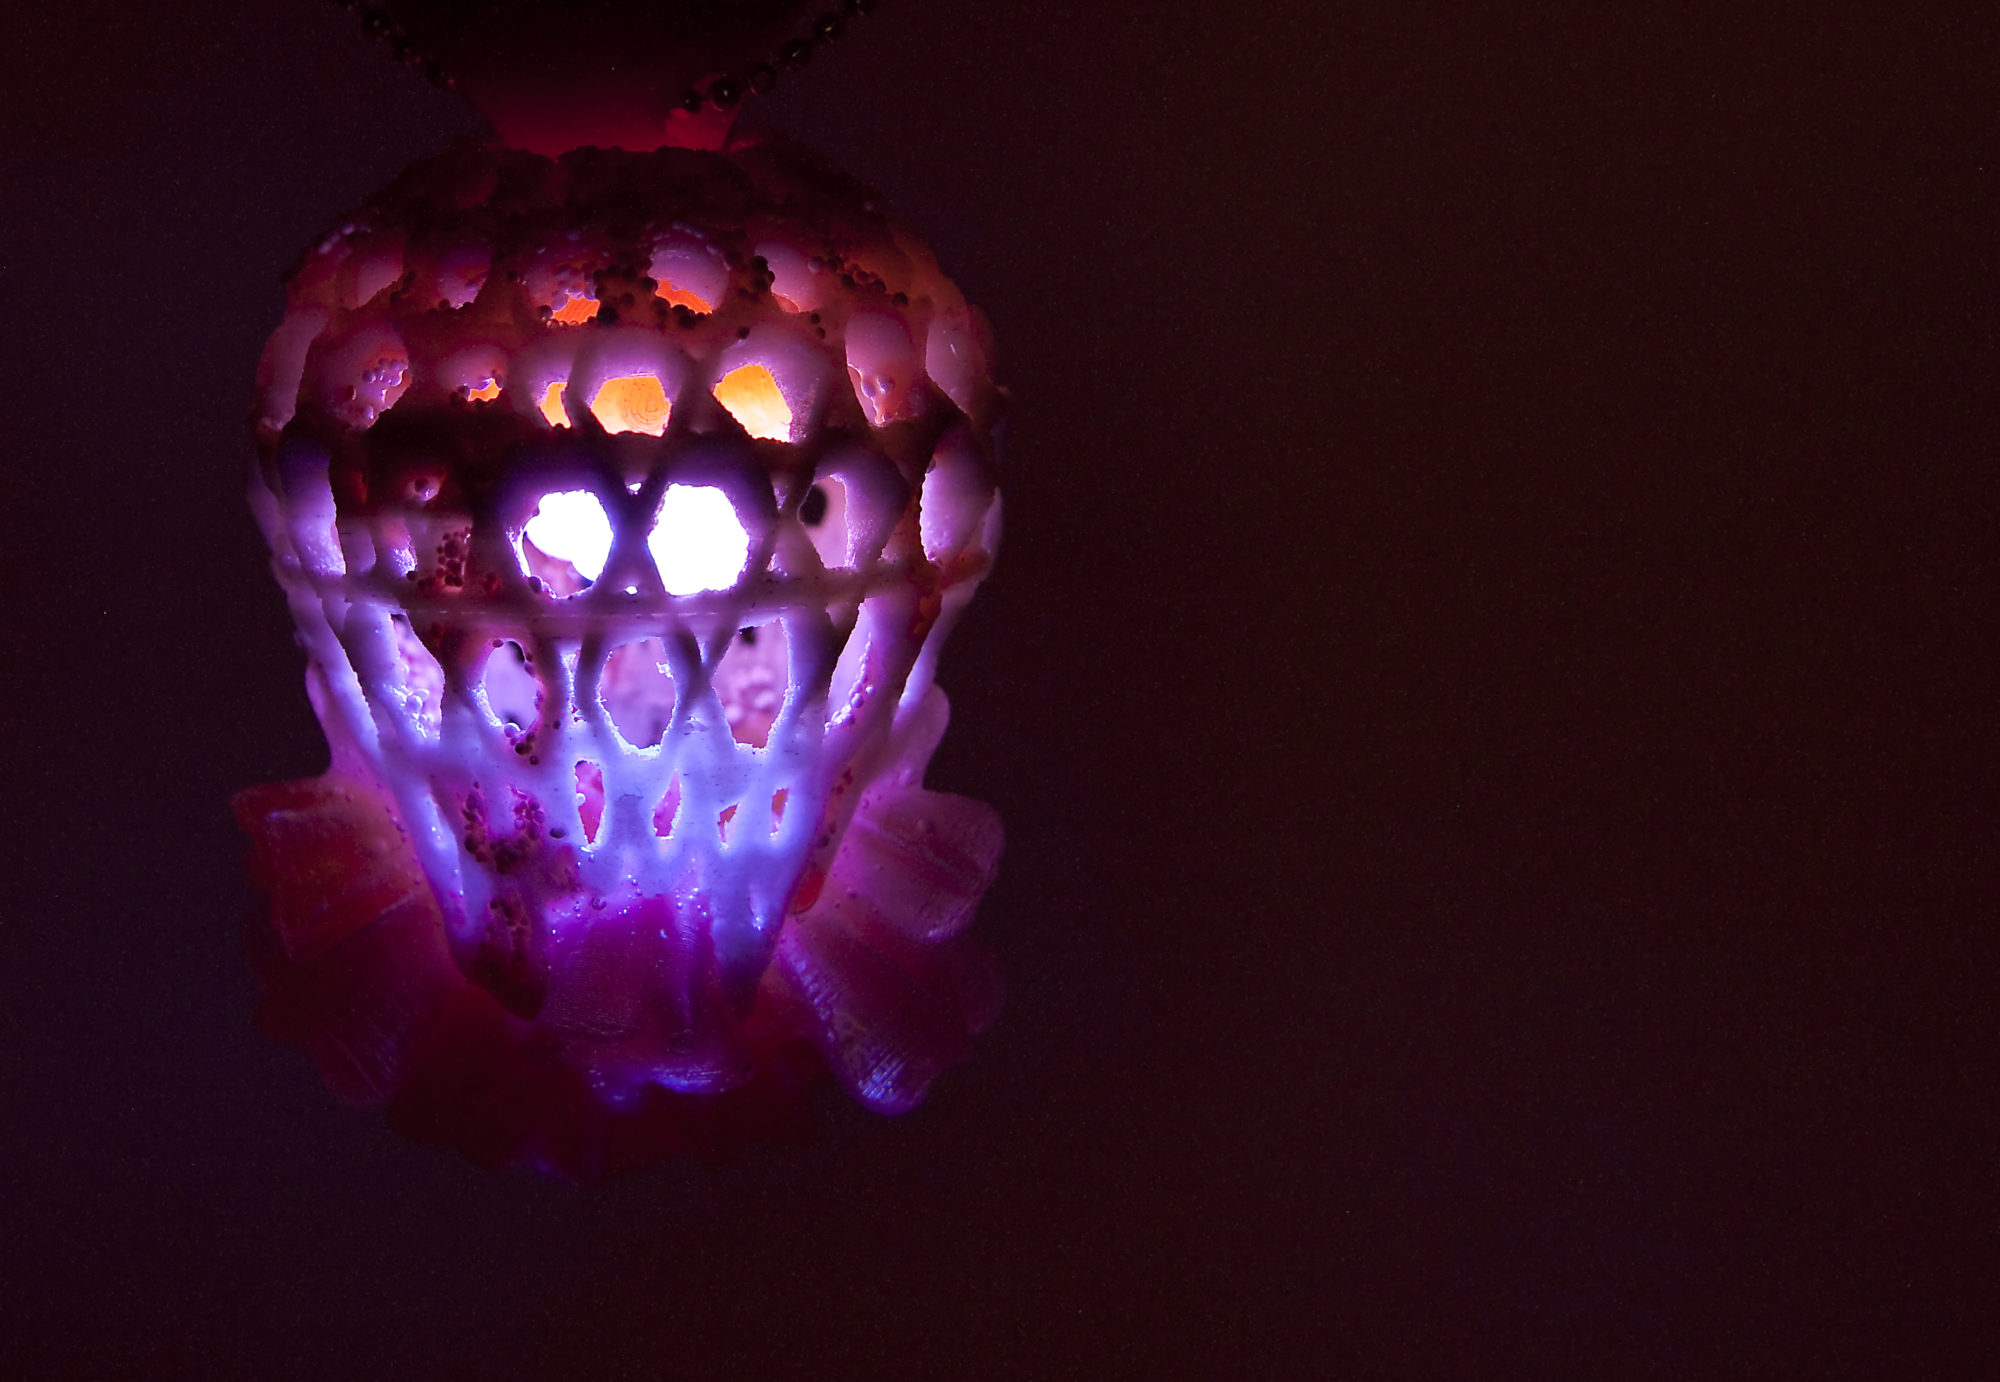
Anyway, the first flexible filament I road-tested on my printer was the Ultimaker PLA Flexible-White filament that came as part of my original order. I figured that as an ‘official’ filament by Ultimaker it should cause less potential problems than others. It is quite a bit stiffer than the Recreus FilaFlex I tested afterwards, and this means that retraction settings actually work. Some people on the forum recommended putting some oil on the filament prior to printing, but I really really didn’t want to have to take apart my printer again to clean off residue, so just loaded the filament, ramped up the temperature a bit to 230C on my usual settings and hoped for the best. This is the result:
The Hyperhive Cocoon in Ultimaker PLA Flexible-White, printed at 230C
I am really pleased with the quality of this print – if anything stringing is even less of an issue with the flexible PLA than with normal PLA, making for a cleaner print and less tidying up afterwards. However, I was a bit disappointed at first about the flexibility of the shape – having expected something akin to silicone, this felt more like a very stiff rubber gasket. I looked up the shore hardness of the material and at A 92 it is at the harder end of the spectrum.
So, fired up by my initial success, I decided to try the second filament I had ordered – Recreus FilaFlex, in both black and purple. At a shore hardness of A 84, the filament itself felt a lot softer immediately, and was a bit difficult to thread through the Bowden tube and material feeder. There are very detailed printing instructions on the website (including the disclaimer that this filament is not suitable for Bowden-type printers!) and Recreus even sell their own hotend optimised for this type of filament. There appears to be a specifically formulated Bowden FilaFlex in the pipeline, but here I was with two rolls and a sense of reckless abandon. I considered the oil again but decided against it for above reasons. However, after reading various posts on the forums I decided to turn off retraction, and instead ramp up the flow rate to 150%. This was the result:
The Hyperhive Cocoon in FilaFlex Black, printed at 230C and 150% flow rate
The image above shows the cocoon after I had removed the worst stringing, but the result was not bad at all, especially considering the very pleasing squishiness of the material. In terms of feel, this is definitely a lot more like what I was expecting, but there are clearly still issues with oozing and stringing that would need to be addressed. For comparison, here are some purple FilaFlex shapes I photographed prior to cleaning
FilaFlex Purple
The middle shape was printed with the retraction turned on – a complete disaster both in terms of stringing and underextrusion. The shape on the right displays the best characteristics, which I achieved by turning up the printing speed to 150 and reducing the flow rate to 130%. These figures still need some fine-tuning, but I was pleased to achieve any type of acceptable results with the FilaFLex at all.
There are still a lot of other flexible filaments to try out there, and these first results are very promising. For my purpose, the Ultimaker Flexible PLA is probably more suitable, but the FilaFlex might be interesting for some more experimental work.
Since getting my Ultimaker up and running, I have been avidly researching the most wild and wonderful types of filament to print with. There have been a lot of exciting developments in the unusual FDM (Fused Deposition Modelling) filaments sector recently, and it seems more filaments are getting announced every day on Kickstarter. I am starting this series of posts of some of the ones I am most excited about at the moment, although this list may change in time!
FormFutura Filaments
FormFutura, led by filament whizz Kai Parthy (read all about him in this interview) is responsible for some of the most exciting filaments on the market at the moment. Parthy started out by developing LayWood, a filament to imitate the feel and appearance of wood and LayBrick, developed with mainly architects in mind to create prints with a stone-like appearance and feel. LayBrick is so far the only FormFutura filament on my shelf. It is a mixture of PLA and chalk powder, and prints at a temperature between 165C and 220C, although variations in either direction are probably possible. It is quite heavy and somewhat brittle – I managed to snap the coil twice while inserting it through the bowden tube. This is one of my Hyperhive Cocoons printed in LayBrick:
My first print in Laybrick, the Hyperhive Cocoon at 190C
I love the chalky texture of the surface, and how it makes the cocoon look like a calcified fossil. Check out this extended printing guide on fellow blog Extrudable Me! This material will definitely be used for my work in the future – it is very akin to the texture and feel of the z-corp ceramic material, the qualities of which I’ve always adored.
The only downside is nozzle wear – the UMO’s brass nozzle is no match for the fine ceramic particles, which means over time the nozzle will be ground down and lose definition. This is the case for a lot of exotic filaments and is just something that I might have to accept by keeping a spare nozzle in reserve. Kai Parthy has just announced MoldLay, a filament developed for the lost wax casting process, which I am sure jewellery designers around the world are as excited about as I am! FormFutura also brought to the market porous and felty filaments under the umbrella name PoroLay, which I am dying to try out next for their flexible characteristics. Watch this space!
So, after deciding to go with the kit version of the Ultimaker Original +, the fun started at the beginning of December with the arrival of a pleasingly heavy box on my doorstep. At this point I would like to say that I absolutely love online shopping – the postman is to my mind a much improved version of Santa, delivering goodies to your doorstep all year round :).
Unboxing time!
Inside the box awaited three layers of components, with the laser cut plywood frame pieces at the very bottom. Getting these to my house unscathed had been my biggest worry, but luckily everything was well wrapped and nothing was damaged in transit.
Lots of…stuff.
But hold on! No packing list. I had literally no idea what anything was (only a few of the plastic bags were labelled) and so went into a mild state of panic. Luckily for the first step of the assembly process no instructions were needed – lightly sanding and painting the plywood parts. I had been to the DIY store earlier and decided on a colour scheme of satin blue for the main body and fluorescent pink for the moving parts. Mixing the paints with water to thin them down and adding custom pigment was something I had read about on various Ultimaker blogs, and it worked an absolute treat, leaving a lovely translucent matte finish.
Painting and sanding all the little parts took forever…
This step took a lot longer than I thought, especially as I wanted to preserve the beautiful dark laser-cut edge on all the pieces. After I had painted all the sating blue structural parts, I started assembling the main frame.
The main frame, assembled and in situ…
My studio is starting to get a little crammed with me adding more and more gadgets over the years, so I had to start expanding upwards by modifying a huge ikea shelf with a pull out platform. It’s the perfect size for my Ultimaker, and the shelves above hold my collection of various filaments. The assembly process itself took about seven days in total, and there were various bumps in the road as the parts were not fully labelled (particularly the multiple bags of screws) and such operations rarely go completely smoothly. But by the end of December, as 2015 was dawning, my Ultimaker was fully pimped and ready to go…and here it is in all its glory, my ‘girly’ Ultimaker Original + as one of my (male) friends called it – with mood lighting!
With Santa having clearly read this blog and listened to my prayers, it was no wonder that (with the help of my savings account) his little elves were busy this Christmas and left a pleasingly large parcel on my doorstep! My new Ultimaker Original + kit had arrived – Squeee!
As a true techno-nerd-in-training it had to be the kit version for me – and just as ‘Santa’ was busy researching the options, the new UMO+ came out, with a heated bed and improved z-stage. If you’ve followed my admittedly sporadic postings, you will have read that at an earlier point I had considered Makerbot and the UP. Well, I have become thoroughly disenchanted with Makerbot in the meantime, mainly because of their withdrawal from the open-source community and the dodgy IP controversies surrounding Thinigverse. I believe in open-source, and have been following the recent commercialisation of the personal 3D printer market with great worry. There are fewer kit products now the market now than when I started this research project, and the general trend to provide a finished ‘out of the box’ printing experience – while not unexpected – is a great shame, particularly because if you know your machine inside out it becomes easy to diagnose and fix any problems that might occur. And occur they will, even the most sophisticated 3D printers eventually need to be maintained. The worst development in my opinion is the push of certain brands towards custom ‘cartridges’ of filament – do we really want 3D printing to go the way of the inkjet? Not me, and that is why the UMO+ was my choice.
After a good two weeks of painting, sanding, screwing and wiring, my fully pimped Ultibaby was ready to go and produce its first test prints. And after ironing out a few kinks along the way, it has now been up and running smoothly for the last month. My studio is getting filled with brightly coloured bits of plastic in the meantime – don’t underestimate the power of the Ulti….